
Counter Strike Non-steam dedicated Server tutorial
Counter Strike Source dedicated server tutorials
Having problem building up a Counter Strike Source dedicated server? Your problems are now gone. You will find here the easiest tutorials on how to set up a counter strike dedicated server, how to configure it, how to install it’s plug-ins Amx Mod X . Just read carefully the tutorials, follow the steps and the result will be co0L.
What you learn.
1. Counter Strike 1.6 non steam dedicated server Tutorial
2. Steam Tutorial for Counter Strike
3. Amx Mod X Tutorials
Counter Strike 1.6 non steam dedicated server:
In order to install a Counter Strike 1. 6 dedicated server, you need :
a.Windows XP, processor 1000 ghz, memory 256 ram
b. Connexion to internet
c. 300 - 400 MB free space on disk
You shall have to follow a few steps :
1. Connect to the internet.
2. Download here Server creator.
3. Unzip it into c: drive on your Hard disk. (make sure it should be in your c: drive in HLDS directory i.e. c:\HLDS)
click on image for higher resolution

Wait for a few mint and a blue window will appear on screen displaying the scroll of the installation .

At this point the installer downloads and installs all the server`s components in your HLDS directory. It can take some time to do it, depending on the internet connection , so have a little pacience .When the installer finishes his work , check out the HLDS directory and see if it has approximativly 315 MB .If it has , then everything it`s ok and if it hasn`t 315 MB you`ll have to repeat this step .Open the HLDS directory ; it should look like this :

The cstrike folder should look like this

4. Next step is to configure to server.cfg in order to make your server work on internet. Go to HLDS\cstrike folder and open server.cfg with notepad. Then look for the line sv_lan 1 and change it to sv_lan 0. then copy this lines:
setmaster add 69.28.151.162
setmaster add 72.165.61.189
setmaster add 207.173.177.11
setmaster add 68.142.72.250
setmaster add hlmaster.jolt.co.uk
setmaster add 65.73.232.251:27040
setmaster add 65.73.232.253:27040
setmaster add 207.173.177.12:27010
setmaster add 207.173.177.11:27010
save the file.
now you have done very good job and next we will see how to install steam for connecting the user to Counter Strike server. You may think that we are making non-steam Counter Strike, what is the need of steam application. And the answer is: Steam it is application which connect user to one plate forum without steam application non-steam server will not work as well. Ok it is enough now hmmmmm.
Steam Tutorial for Counter Strike
Steam is an application which use for connecting your Game (counter strike, Half-life etc) to the internet (world wild). It is also compulsory for non-steam dedicated server as well. Ok let us your glance to the step of installing Steam For Counter Strike 1.6.
1. Download your steam application here.

2. After download completed double click on “steaminstall_cs.exe”
3. Click on “I Agree >”.
4.then click next
4. Select you connection speed for steam. ( My one is 512 kb/s therefore I have select DSL greater then 256k and click next.
5. One last step as click on next button and the installation starts.

Now steam installed in your computer but it will not work if you will not update steam application. Ok let’s see how to update?
Update the Steam Application
1. download steam update version from here .

There is same procedure of installing the update version. I hope you can handle that.
Amx Mod X Tutorials:
Ok you have done 90% of your work, is it good. One last thing To work your server is Amx Mod X plug-in.
Procedure: Here are few setup installing Amx Mod X.
1. Click here to download.
2. unzip it anywhere on your disk and double click on AmxModx exe file.
3. Press redio button “I accept the term”, next.
4. There you are on the selection window. Let the default installation path ( C:\Program Files\AmxModX) selected, click next, then Install . Now the installation is ready to begin. Click Finish. (with the “Run Amxmodx installation” case selected.


5. “I accept the terms” next.
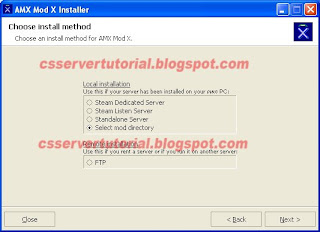
6. now you have to select the directory path to install amxmodx. Here you choose the fourth case, which is “select mod directory” and hit next.
7. Now the c:\HLD\cstrike folder chose Counter-Strike and press ok.

8. Ok one last work you have to do, download here
9. unzip anywhere in you desk and you will see “addons” folder double click on it there is amxmodx and open it as well. There we have five subfolders: “configs, data, modules, plugins and scripting” folder. copy the files inside each subfolder in the folders with same name in HLDS\cstrike\addons\amxmodx. You will be asked if you want to averwrite the existing files and your shall click ok. And don’t forget to copy the files inside the subfolders, not the folders themselves!

You have done nealy Everything which required for counter strike dedicated server, but you have to Forword the Port as well.
Click here for Portforword Tutorial.
Read more...

